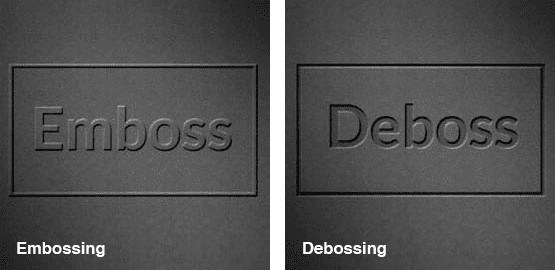
Embossing and Debossing
Embossing is applied to selected areas of paper to create a raised shape or image. The embossed area becomes 3 dimensional providing a tactile and visual contrast against the flatness of the rest of the sheet.
Embossing is typically used where a high end, bespoke look is desired, e.g, wedding stationery, letterheads, folders, certificates, packaging etc. It is also useful as a security aid against counterfeiting.

How is embossing applied
The paper is placed between 2 metal magnesium or copper dies. The die underneath the paper will contain the raised pattern and the die on top of the paper (the counter die) will have a recessed version of the same pattern. The 2 dies are then pressed together using both heat and pressure forcing the paper into the recessed die, thus causing the paper fibre to be squeezed to create the permanently embossed area.
Types of embossing
Blind Embossing
Blind embossing is used to describe a raised but unprinted area. This provides a noticeable but subtle contrast without the use of any ink or foil and is able to cope with fairly small detail.
Registered Embossing
This is when the embossing is used in conjunction with print, foil or spot UV varnish (or a combination of more than one of these). A second embossed area can also be used to provide even more contrast.
Combination Embossing
An image is printed, foiled or applied in spot UV and the embossing is aligned to the image so that the printed image is stamped out. This method is particularly suited to text and simple images.
Debossing
Debossing is exactly the same process as embossing, except that the metal dies are transposed so that the area is stamped into the paper and forms a recessed (dented) area.
Just like embossing you can have the area plain and unprinted with just the debossed effect, or you can fill the area with ink or foiling.

Things to consider before you start
Artwork
Vector files are best for this process as they can easily be scaled up or down without loss of quality
Keep it simple – The embossing is the star of the show so avoid shading and where possible keep to a single colour so that the embossing isn’t lost in the print. This is especially advisable if you’ll be using combination embossing.
Choosing the embossed area
Less is best. The wow factor of the embossing is maximised when its used sparingly, however it’s a matter of personal choice and should be tailored to the specific item in question, e.g, you may wish to have an all over embossed or debossed pattern on an invitation or business card, with a registered or combination embossed area to contrast the background pattern.
Choosing the pattern and Paper weight
Consider the depth of your embossing. Deep embossing isn’t suitable for small areas as the paper will be susceptible to tearing. If multi-level embossing is to be used then use the deeper levels in the less intricate areas to minimise any distress to the paper.
Your paper will need to be thick enough to accommodate the depth without being weakened so if deep embossing is to be used then a heavy paper weight is recommended. A deep emboss onto a heavy weight paper will give a deep and detailed image.
Consider the reverse
The embossing or debossing process will move the paper to the other side of the sheet so there will inevitably be a raised or recessed area on the other side of the sheet.
If you have any further questions about embossing or debossing then call us on 023 8087 8037 or email us.
